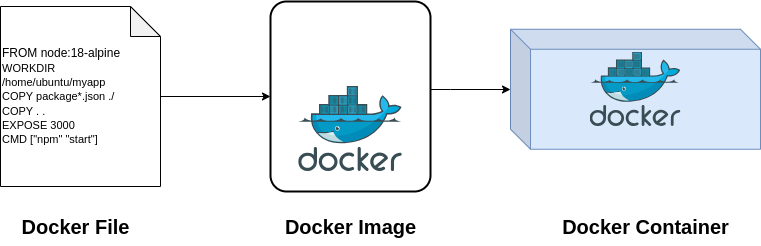
Docker is a platform and toolset for developing, shipping, and running applications inside containers. Containers are lightweight, isolated environments that package an application and its dependencies, ensuring consistency across different environments, such as development, testing, and production.
Pre-requisiites:
- Latest version of docker should be installed on your system
- Need the sample nodejs application code.
Create the Dockerfile:
Step 1: Create the dockerfile:
sudo touch DockerfileStep 2: Define the Base image for an application:
You have find out the suitable base image for your application. Base image should be minimum size and lightweight. It uses a minimal base image of Node.js (version 18 in this example) to reduce the attack surface and keep the image size small.
Alpine images are lightweight and most used to create the docke containers.
FROM node:18-alpineStep 3: Create a non-root user to run the application
Create a non-root user to run the application. This is for best security practices. It creates a non-root user (nodejs) to run the application, which is a best practice for security to minimize the potential damage if a security breach occurs.
# Create a non-root user to run the application
RUN useradd -ms /bin/bash nodejs
USER nodejs
Step 4: Create the working directoty for your application
This is the main directory in the docker container where all your application code copy when you create an image from the Dockerfile.
Step 5: Install the app dependancies while creating docker image
This nodejs alpine images comes with the node.js and npm already installed inside the base iamges. You just need to install the application dependancies.It copies package.json and package-lock.json separately and runs npm install before copying the rest of the application code. This leverages Docker’s layer caching to avoid reinstalling dependencies if the package.json or package-lock.json files haven’t changed.
# Install node.js application dependancies
# A wildcard is used to ensure both package.json AND package-lock.json are copied
# where available (npm@5+)
#  only package.json and package-lock.json first and install dependencies to leverage Docker layer caching
COPY package*.json ./
RUN npm install
# If you are building your code for production
# RUN npm ci --omit=dev
Step 6: Copy the Rest of application Code
To copy the all other files. Use the following command.
copy . .First “.” is the source current path
second “.” is the destination path which is the path of working directory that we have already defined.
Step 7: Expose the ports for external Communication
EXPOSE 3000Step 8: Specify environmen variables
It sets the NODE_ENV environment variable to production. This should be tailored to your application’s specific environment needs.
# Specify environment variables
ENV NODE_ENV=production
Step 9: Start the node.js application
This command should be different for different node.js application. You have to coordinate with the developer about to get the exact command to start an application.
CMD ["npm" "start"]OR
CMD ["node" "server.js"]Final Dockerfile should be look like as below:
FROM node:18-alpine
# Create app directory
WORKDIR /home/ubuntu/myapp
# Install node.js application dependancies
# A wildcard is used to ensure both package.json AND package-lock.json are copied
# where available (npm@5+)
#  only package.json and package-lock.json first and install dependencies to leverage Docker layer caching
COPY package*.json ./
RUN npm install
# If you are building your code for production
# RUN npm ci --omit=dev
# Copy the application code.
COPY . .
EXPOSE 3000
# Specify environment variables
ENV NODE_ENV=production
CMD ["npm" "start"]
#CMD ["node" "server.js"]