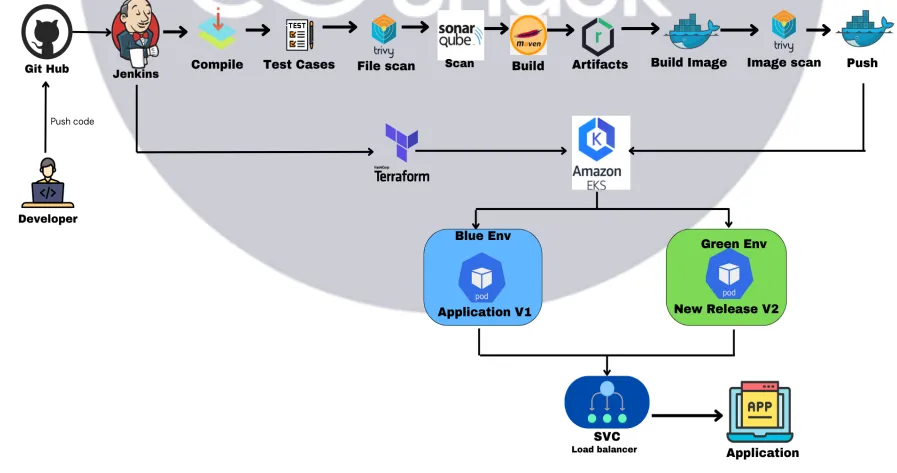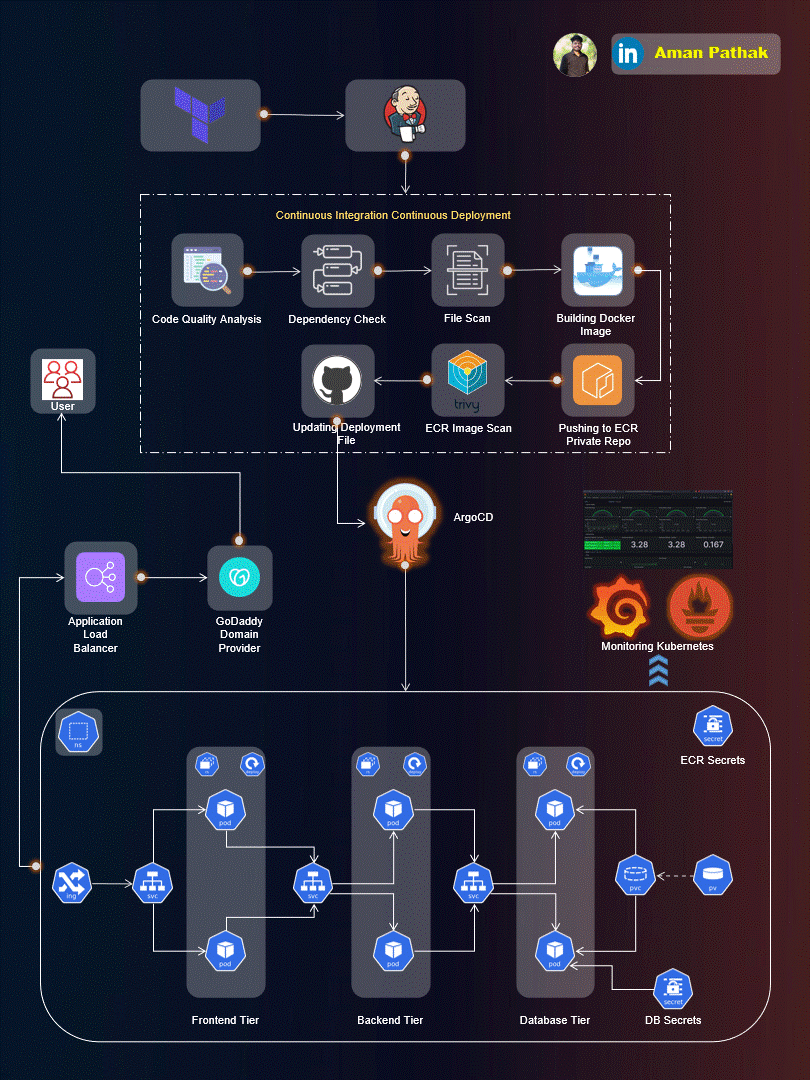
Introduction:
In this project, we are going to deploy the 3-Tier MERN stack application on AWS EKS cluster. We will create each and every step from scratch. This project gives you the hands-on experience about “How you can setup the DevSecOps CICD pipeline from scratch.
Pre-requisites:
Before implementing this project, you just need to ensure the below things:
- AWS IAM user access with Administrator access.
- Basic knowledge about AWS, Docker, Kubernetes, Jenkins
Step 1. Create AWS IAM user and generate access key and secret key:
Please make sure the setup the each and every resource using IAM user. Because in the real world production screnario, No one will give you the administrator access. So you should know about how resource access works using AWS IAM service
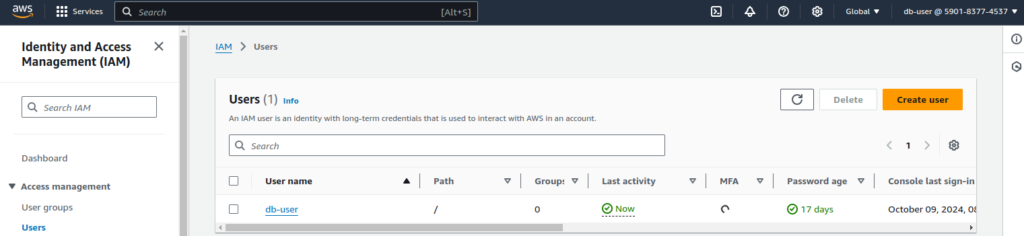
1.Create IAM user
Go to “IAM user“
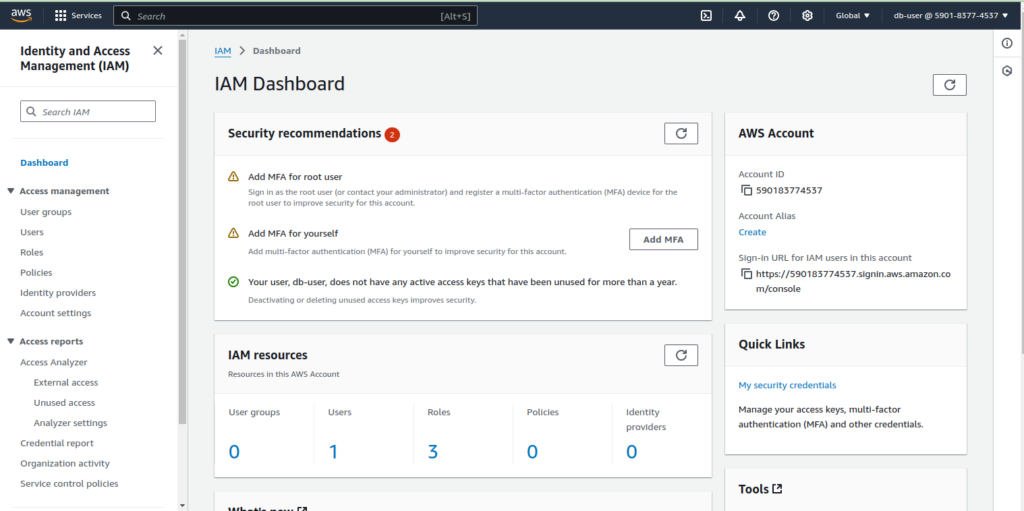
Click on “Users“
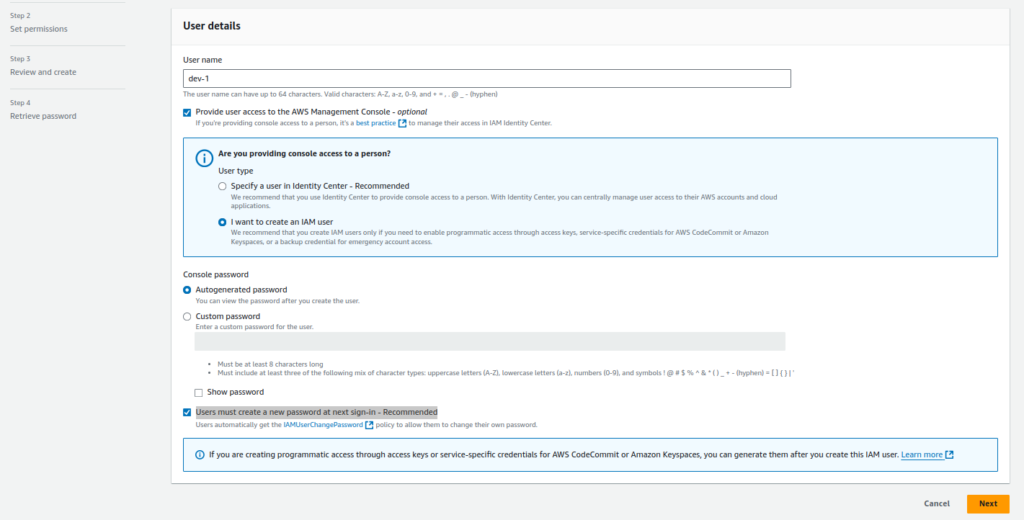
Specify the below user details and click on “next“
User Details:
- Click on checkmark and click on “I want to create an IAM user” (To provide the console access)
- select “Autogenerated password“
- click checkmark on “Users must create a new password at next sign-in – Recommended“
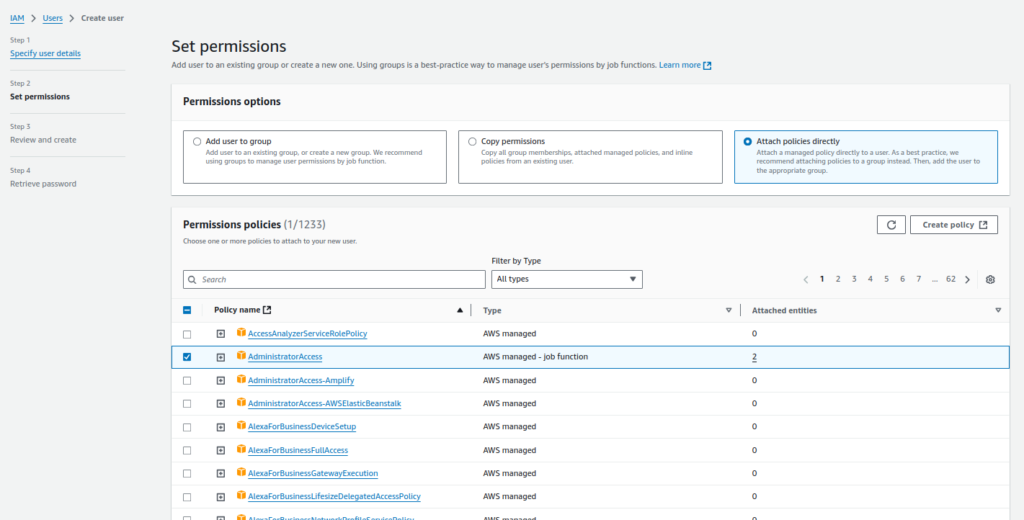
Select “Attach policy directly option” and Search for “Administrator Access“
select the “administrator access” and click on “next“
This is the demo project, so we will use administrator policy. In real production scenario, you will get the limited access related to services which you are going to create.
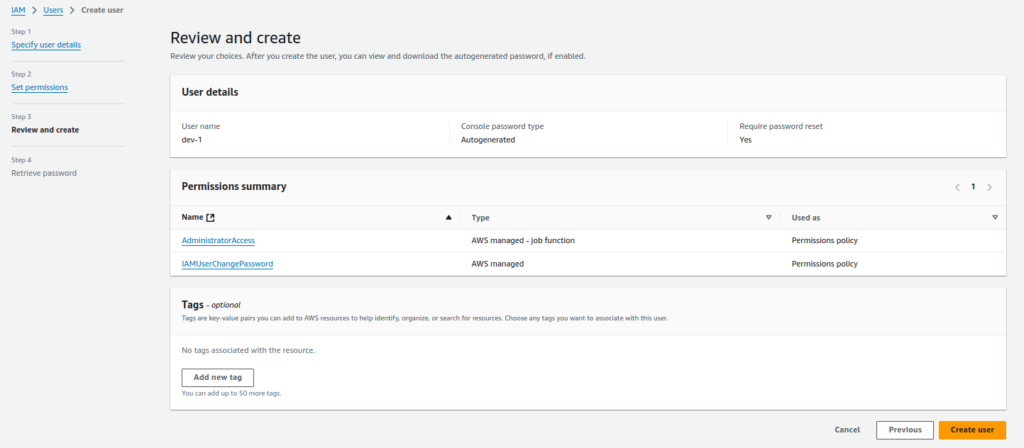
Click on “Create User“
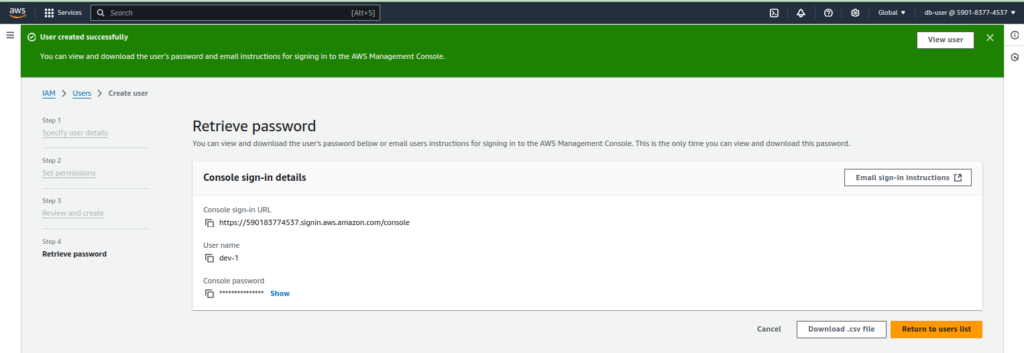
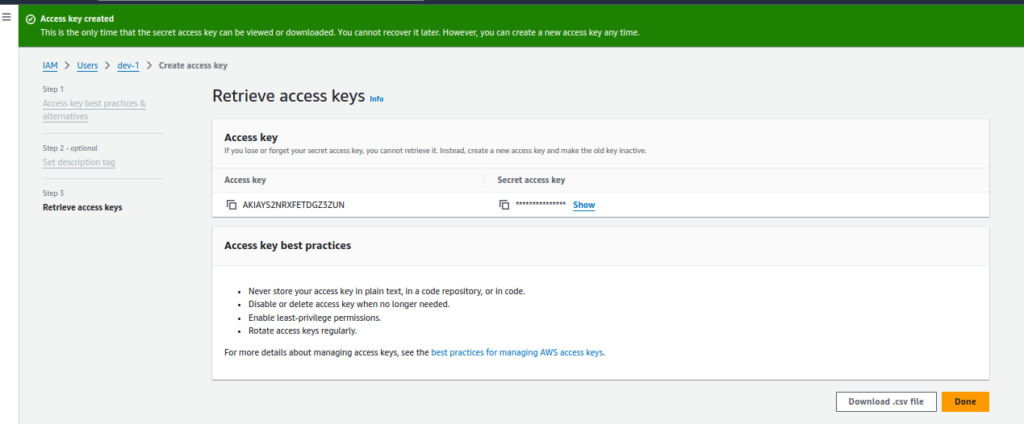
Download the .csv file for access key and secret key.
2. Create access key and secret key.
Click on “IAM User” which you have created on above step. then Go to “security credentials” and Click on “Create Access key“

Select the “command Line Interface” option and select the “Checkmark option” and click on “next“
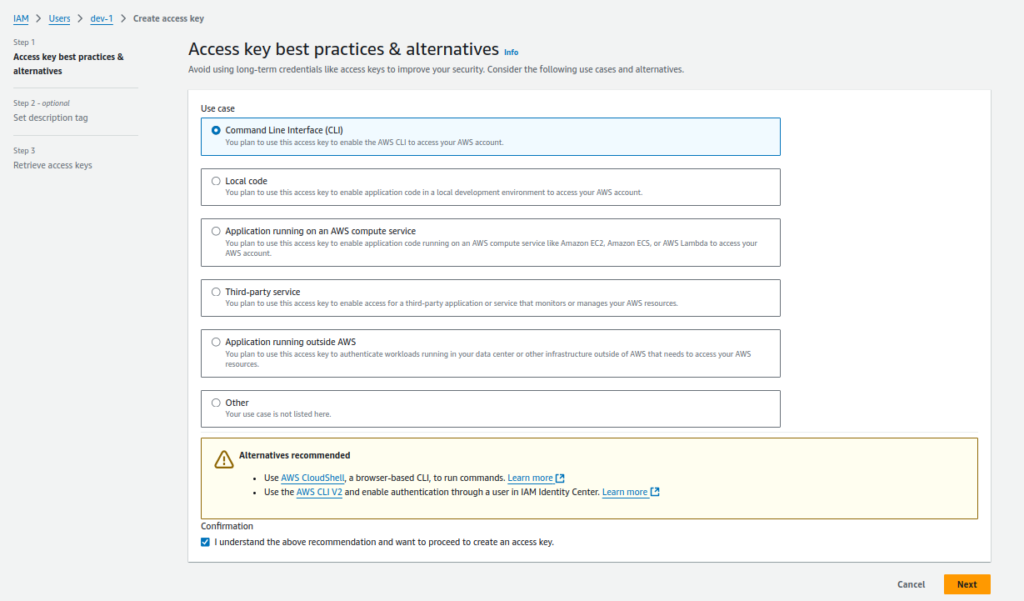
Provide the description and Click on “create access keys“
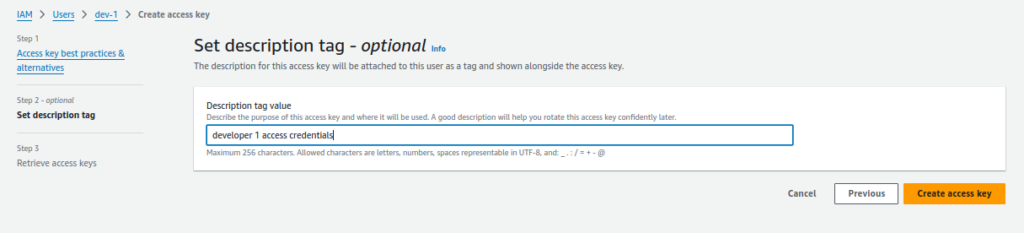
Click on the “Download csv file” button and Save the keys for the future use.
Step 2: Create the EC2 Instance to setup to run this demo project:
We are going the create the single EC2 instance as this is demo project. we will also save some cost if we use this scenario. When EC2 instance created then we will install below applications on a server.
EC2 instance config:
- Server Name: Demo-run-server
- Instance type: t2.xlarge ( 16 core, 32 GB RAM)
- OS volume size: 25 GB
Note: Above configuration is not comes under free tier configuration. Please make sure to terminate the instance when your demo is complete. if you want to keep the server as it is for future use then stop the server. It will cost you only the EBS volume size in the stopped state.
We will install the below dependencies on a server:
- Install jenkins (To create the CICD setup)
- Install docker (To create the docker images)
- install trivy (To scan the code and docker images)
- Install aws cli (To connect with aws account to create and manage resources)
- install eksctl ( To connect with AWS EKS Kubernetes CLI interface to create resources on AWS)
Install jenkins:
1. install latest version of java on ubuntu 24.04:
sudo apt update -y
sudo apt install openjdk-21-jdk -y
2. Check the installed java version:
java --versionOutput will be look like:
openjdk 21.0.4 2024-07-16
OpenJDK Runtime Environment (build 21.0.4+7-Ubuntu-1ubuntu224.04)
OpenJDK 64-Bit Server VM (build 21.0.4+7-Ubuntu-1ubuntu224.04, mixed mode, sharing)
Install latest version of Jenkins:
sudo wget -O /usr/share/keyrings/jenkins-keyring.asc https://pkg.jenkins.io/debian-stable/jenkins.io-2023.key

echo "deb [signed-by=/usr/share/keyrings/jenkins-keyring.asc]" https://pkg.jenkins.io/debian-stable binary/ | sudo tee \
/etc/apt/sources.list.d/jenkins.list > /dev/null

sudo apt update -y
sudo apt install jenkins -y
sudo systemctl start jenkins && sudo systemctl enable jenkins
Install latest version of docker:
https://www.cherryservers.com/blog/install-docker-ubuntu
sudo apt update
sudo apt install curl apt-transport-https ca-certificates software-properties-common

curl -fsSL https://download.docker.com/linux/ubuntu/gpg | sudo gpg --dearmor -o /usr/share/keyrings/docker-archive-keyring.gpg

echo "deb [arch=$(dpkg --print-architecture) signed-by=/usr/share/keyrings/docker-archive-keyring.gpg] https://download.docker.com/linux/ubuntu $(lsb_release -cs) stable" | sudo tee /etc/apt/sources.list.d/docker.list > /dev/null

sudo apt update
sudo apt install docker-ce -y
Add user in the docker group:
sudo usermod -aG docker $USER
sudo systemctl restart docker
sudo systrmctl enable docker
sudo chmod 777 /var/run/docker.sock
Install trivy:
official link: https://aquasecurity.github.io/trivy/v0.18.3/installation/
sudo apt-get install wget apt-transport-https gnupg lsb-release

wget -qO - https://aquasecurity.github.io/trivy-repo/deb/public.key | sudo apt-key add -

echo deb https://aquasecurity.github.io/trivy-repo/deb $(lsb_release -sc) main | sudo tee -a /etc/apt/sources.list.d/trivy.list

sudo apt-get update

sudo apt-get install trivy
Install Latest version of awscli:
Offical Blog link: https://docs.aws.amazon.com/cli/latest/userguide/getting-started-install.html
curl "https://awscli.amazonaws.com/awscli-exe-linux-x86_64.zip" -o "awscliv2.zip"
sudo apt install unzip
unzip awscliv2.zip
sudo ./aws/install
Install latest version of terraform:
sudo apt install gnupg software-properties-common -y

wget -O- https://apt.releases.hashicorp.com/gpg | sudo gpg --dearmor -o /usr/share/keyrings/hashicorp-archive-keyring.gpg

echo "deb [signed-by=/usr/share/keyrings/hashicorp-archive-keyring.gpg] https://apt.releases.hashicorp.com $(lsb_release -cs) main" | sudo tee /etc/apt/sources.list.d/hashicorp.list

sudo apt update
sudo apt install terraform -y
Install latest version of eksctl:
Blog link: https://eksctl.io/installation/
# for ARM systems, set ARCH to: `arm64`, `armv6` or `armv7`
ARCH=amd64
PLATFORM=$(uname -s)_$ARCH

curl -sLO "https://github.com/eksctl-io/eksctl/releases/latest/download/eksctl_$PLATFORM.tar.gz"

# (Optional) Verify checksum
curl -sL "https://github.com/eksctl-io/eksctl/releases/latest/download/eksctl_checksums.txt" | grep $PLATFORM | sha256sum --check

tar -xzf eksctl_$PLATFORM.tar.gz -C /tmp && rm eksctl_$PLATFORM.tar.gz

sudo mv /tmp/eksctl /usr/local/bin
Step 3. Setup AWS credentials in the Jenkins Server:
We need to install “aws credential” plugin on Jenkins server to store the AWS credentials. These credentials will use to communicate with AWS services to do the task.
1. Install AWS credentials plugins:
Go to “Manage jenkins” -> click on “Plugins” -> select “Available plugins“
Search the “AWS Step” in the search bar and Select “AWS Credentials” and “Pipeline: aws steps” plugin

Click on “Install plugins“
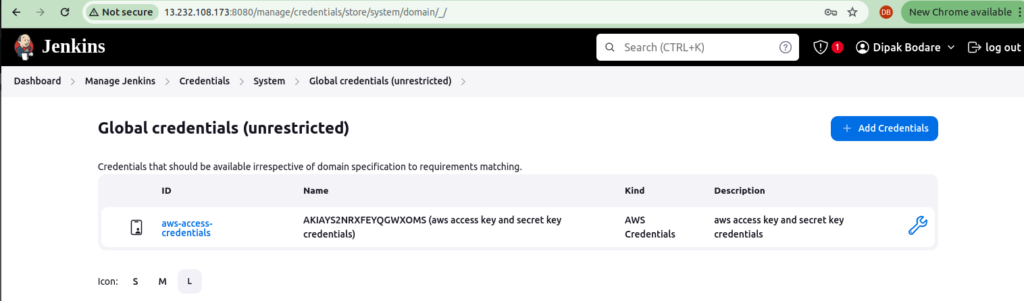
2. Setup AWS Credentials:
Go to “Manage Jenkins” -> Go to “Manage Plugins” and click on “credentials“
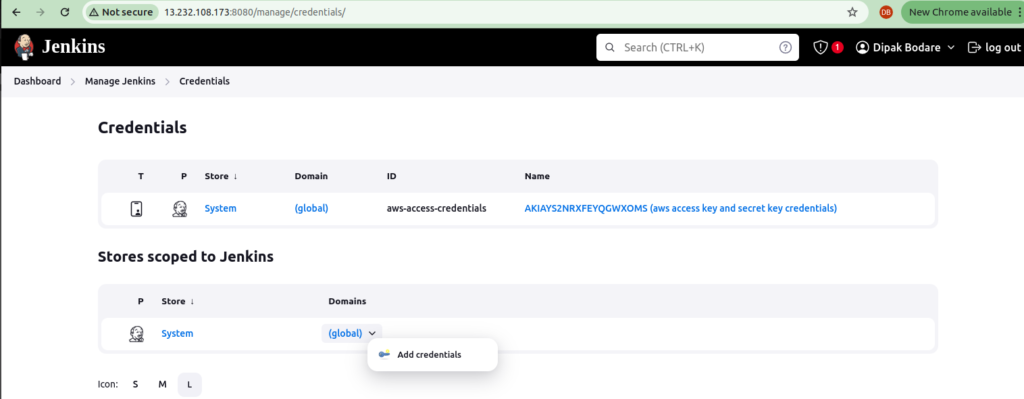
Click on “Global“
Select the below things:
- set kind: aws credentials
- Scope: global (jenkins)
- id: aws-access-secret-key ( You can type any name as per your requirement)
- Description: aws-access-secret-key ( write the description of the key)
- Access Key ID: xx.dqda.adfa.xxx ( paste your aws access key id)
- Secret Access key: xx.xxx.xxxx ( paste your secret access key id)
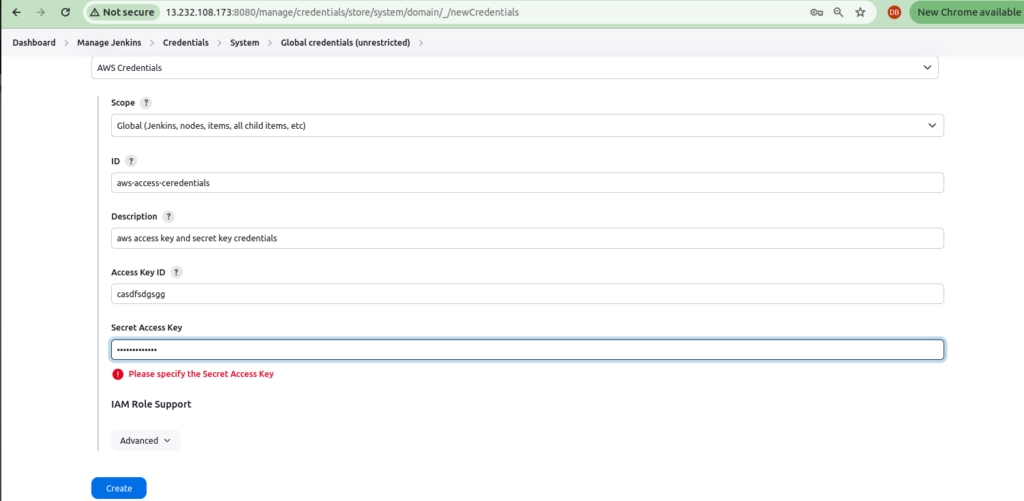
Click on create
Step 4: Setup GIthub Credentials in Jenkins server:
Each organization has its own private git repositories. So we need to integrate private repositories in the jenkins server. You should know, how to integrate the private git repositories with any CICD tool.
Go to “Manage Jenkins” -> “Credentials” -> “System” -> “Global Credentials (Unrestricted)“
Put the below details:
- Kind: username with password
- Scope: Global
- Username: dbxxx (put your github username)
- Password: xxxxx ( Add the personal access token of github account here)
- ID: my-github-id (Put the name which you want)
- Description: my-github-id (Put the credential description)
Credentials will be look like as follows:
Step 5: Install and configure terraform in Jenkins:
Install terraform plugin on jenkins server:
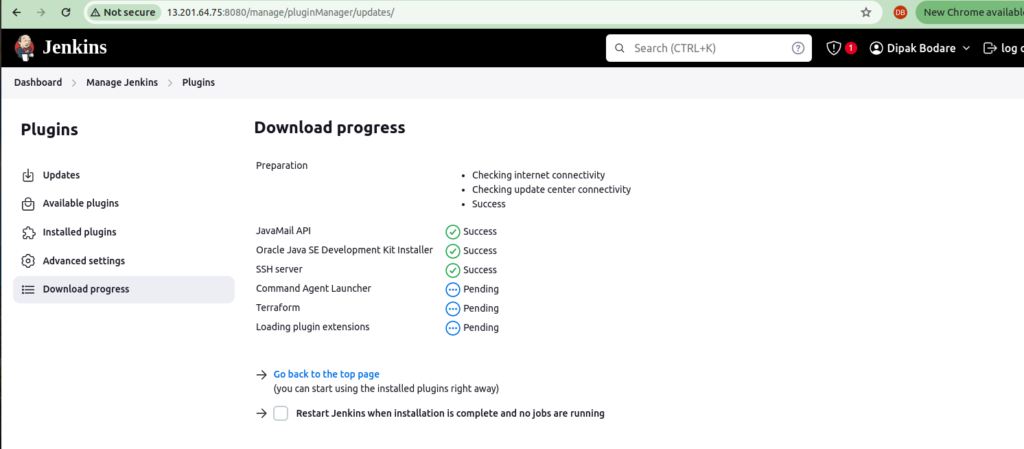
Go to “Manage jenkins” -> click on “Plugins” -> select “Available plugins“
Search the “Terraform” in the search bar and Select “Terraform” plugin
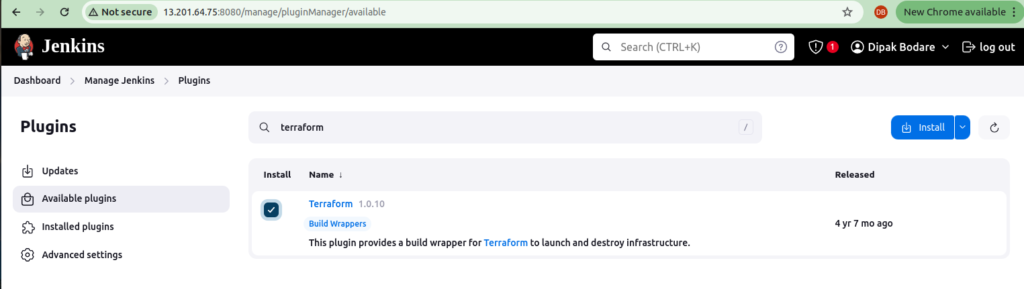
Click on “install”
Configure terrafrom on jenkins server:
Go to “Manage jenkins” -> click on “Systems” -> select “Available plugins“
Step 5: Create AWS ECR repositories for an application
We can go with most popular “docker hub” repository. You can use this for testing purpose but while doing the setup for a production. You dont have to use this docker hub repo. If you have your own company AWS account and ECR service then why you need to do the extra efforts on other services. It will also add the double headche about to manage and maintain the service.
1.Create ECR repo for frontend and backend application:
Search “AWS ECR” in the AWS search box and go to “ECR“
Click on “Private Repositories”
click on “create repository” and provide the option and click on save
options:
- Visibility setting: Private
- Repository Name: <Create your own repository>
When you click on any ecr repo then it will give you the commands to setup aws ecr repo on local server. In our case, we have used same jenkins server setup to check this. We have already configured the awscli on that server.
- Retrive an authentication token and authenticate your docker client to your registery
aws ecr get-login-password --region ap-south-1 | docker login --username AWS --password-stdin 34249274.dkr.ecr.ap-south-1.amazonaws.comYou have to copy your own docker login command.
Click on “create“
Step 7: Create and setup EKS Cluster on AWS Account:
Now all are setup up. We can create the AWS EKS cluster on AWS account. In this project, we have used same Jenkins server to create eks cluster. we have already installed and configured the awscli on the same server to reduce the cost.
1. Login to the Demoserver and run the below command:
Below command will create the aws eks cluster with 2 t2.medium instances in the ap-south-1 (mumbai) region.
eksctl create cluster --name Three-Tier-K8s-EKS-Cluster --region us-east-1 --node-type t2.medium --nodes-min 2 --nodes-max 2aws eks update-kubeconfig --region us-east-1 --name Three-Tier-K8s-EKS-ClusterYou can validate the cluster using below command:
kubectl get nodesStep 9: Setup and configure Load balancer on EKS
This demo application will use the ingress controller. we need to download the policy for load balancer.
1.Download the load balancer policy:
curl -O https://raw.githubusercontent.com/kubernetes-sigs/aws-load-balancer-controller/v2.5.4/docs/install/iam_policy.json2. Create IAM policy using below command:
aws iam create-policy --policy-name AWSLoadBalancerControllerIAMPolicy --policy-document file://iam_policy.json3. Create IAM OIDC Provider:
eksctl utils associate-iam-oidc-provider --region=ap-south-1 --cluster=Three-Tier-K8s-EKS-Cluster --approve4. Create service account and replace your account id with below one:
eksctl create iamserviceaccount --cluster=Three-Tier-K8s-EKS-Cluster --namespace=kube-system --name=aws-load-balancer-controller --role-name AmazonEKSLoadBalancerControllerRole --attach-policy-arn=arn:aws:iam::<your_account_id>:policy/AWSLoadBalancerControllerIAMPolicy --approve --region=us-east-15. Deploy AWS Load Balancer controlller:
sudo snap install helm --classic
helm repo add eks https://aws.github.io/eks-charts
helm repo update eks
helm install aws-load-balancer-controller eks/aws-load-balancer-controller -n kube-system --set clusterName=my-cluster --set serviceAccount.create=false --set serviceAccount.name=aws-load-balancer controller
After some time, please validate the ingress pods are up or not?
kubectl get deployment -n kube-system aws-load-balancer-controllerStep 10: Create secrets for AWS ECR Service
As you know, we are going to use the AWS ECR private repositories to store the docker images. To access these docker images, we need to create secrets to fetch the images on a eks cluster otherwise it will show ImagePullError
Note: These secrets are coming from the .docker/config.json file which is created while login the ECR in earlier steps.
kubectl create secret generic ecr-registry-secret \
  --from-file=.dockerconfigjson=${HOME}/.docker/config.json \
  --type=kubernetes.io/dockerconfigjson --namespace three-tier
kubectl get secrets -n three-tier
Step 11: Install and configure argocd on aws eks cluster.
We should create the seprate environment for each and every service to avoid the confusions and maintain the security.
Create the namespace for argocd:
kubectl create namespace argocdInstall argocd on aws eks cluster:
kubectl apply -n argocd -f https://raw.githubusercontent.com/argoproj/argocd/v2.4.7/manifests/instal.yamlValidate the argocd pods are running or not:
kubectl get pods -n argocdMake the argocd publically accessible:
kubectl patch svc argocd-server -n argocd -p '{"spec": {"type":"LoadBalancer"}}'when you run the above command then it will create the load balancer on aws ec2 service. You can go ec2 section and check the load balanacer is created or not.
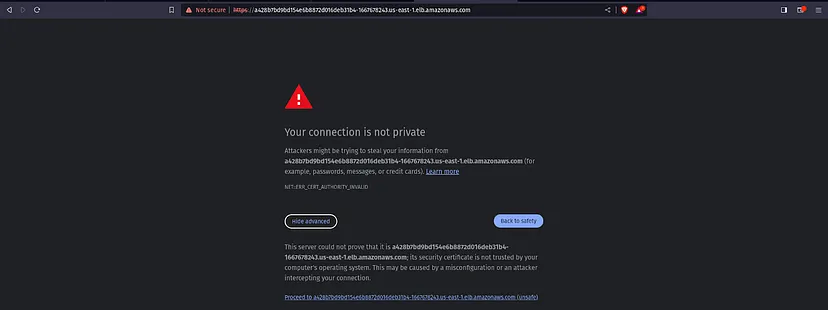
To access the argoCD, copy the LoadBalancer DNS and hit on your favorite browser.
You will get a warning like the below snippet. Click on Advanced.

Click on the below link which is appearing under Hide advanced
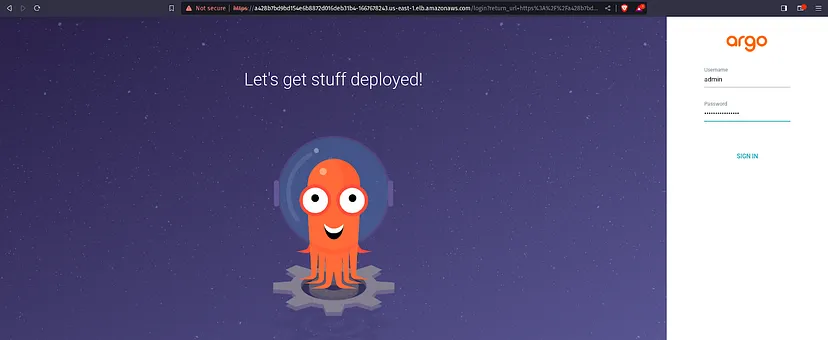
To do that, we have a pre-requisite which is jq. Install it by the command below
sudo apt install jq -yexport ARGOCD_SERVER='kubectl get svc argocd-server -n argocd -o json | jq - raw-output '.status.loadBalancer.ingress[0].hostname''
export ARGO_PWD='kubectl -n argocd get secret argocd-initial-admin-secret -o jsonpath="{.data.password}" | base64 -d'
echo $ARGO_PWDYou will get the argocd password like in the below image:

Enter the username and password in argoCD and click on SIGN IN.
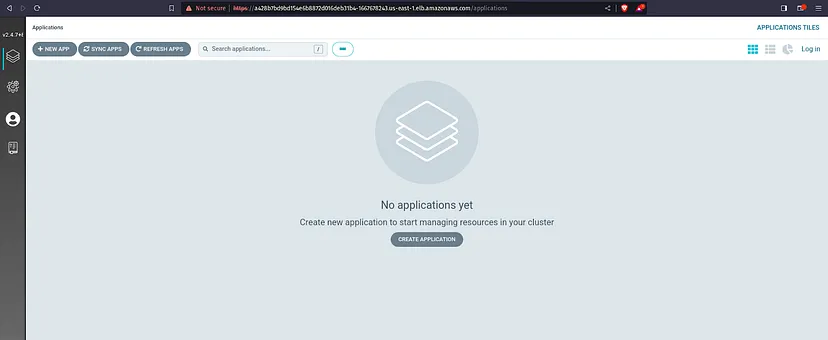
Here is our ArgoCD Dashboard.
Step: Jenkinsfile for frontend and backend service
For frontend jenkins pipeline
pipeline {
    agent any
    tools {
        jdk 'jdk'
        nodejs 'nodejs'
    }
    environment  {
        SCANNER_HOME=tool 'sonar-scanner'
        AWS_ACCOUNT_ID = credentials('ACCOUNT_ID')
        AWS_ECR_REPO_NAME = credentials('ECR_REPO1')
        AWS_DEFAULT_REGION = 'us-east-1'
        REPOSITORY_URI = "${AWS_ACCOUNT_ID}.dkr.ecr.${AWS_DEFAULT_REGION}.amazonaws.com/"
    }
    stages {
        stage('Cleaning Workspace') {
            steps {
                cleanWs()
            }
        }
        stage('Checkout from Git') {
            steps {
                git credentialsId: 'GITHUB', url: 'https://github.com/AmanPathak-DevOps/End-to-End-Kubernetes-Three-Tier-DevSecOps-Project.git'
            }
        }
        stage('Sonarqube Analysis') {
            steps {
                dir('Application-Code/frontend') {
                    withSonarQubeEnv('sonar-server') {
                        sh ''' $SCANNER_HOME/bin/sonar-scanner \
                        -Dsonar.projectName=three-tier-frontend \
                        -Dsonar.projectKey=three-tier-frontend '''
                    }
                }
            }
        }
        stage('Quality Check') {
            steps {
                script {
                    waitForQualityGate abortPipeline: false, credentialsId: 'sonar-token'
                }
            }
        }
        stage('OWASP Dependency-Check Scan') {
            steps {
                dir('Application-Code/frontend') {
                    dependencyCheck additionalArguments: '--scan ./ --disableYarnAudit --disableNodeAudit', odcInstallation: 'DP-Check'
                    dependencyCheckPublisher pattern: '**/dependency-check-report.xml'
                }
            }
        }
        stage('Trivy File Scan') {
            steps {
                dir('Application-Code/frontend') {
                    sh 'trivy fs . > trivyfs.txt'
                }
            }
        }
        stage("Docker Image Build") {
            steps {
                script {
                    dir('Application-Code/frontend') {
                            sh 'docker system prune -f'
                            sh 'docker container prune -f'
                            sh 'docker build -t ${AWS_ECR_REPO_NAME} .'
                    }
                }
            }
        }
        stage("ECR Image Pushing") {
            steps {
                script {
                        sh 'aws ecr get-login-password --region ${AWS_DEFAULT_REGION} | docker login --username AWS --password-stdin ${REPOSITORY_URI}'
                        sh 'docker tag ${AWS_ECR_REPO_NAME} ${REPOSITORY_URI}${AWS_ECR_REPO_NAME}:${BUILD_NUMBER}'
                        sh 'docker push ${REPOSITORY_URI}${AWS_ECR_REPO_NAME}:${BUILD_NUMBER}'
                }
            }
        }
        stage("TRIVY Image Scan") {
            steps {
                sh 'trivy image ${REPOSITORY_URI}${AWS_ECR_REPO_NAME}:${BUILD_NUMBER} > trivyimage.txt'
            }
        }
        stage('Checkout Code') {
            steps {
                git credentialsId: 'GITHUB', url: 'https://github.com/AmanPathak-DevOps/End-to-End-Kubernetes-Three-Tier-DevSecOps-Project.git'
            }
        }
        stage('Update Deployment file') {
            environment {
                GIT_REPO_NAME = "End-to-End-Kubernetes-Three-Tier-DevSecOps-Project"
                GIT_USER_NAME = "AmanPathak-DevOps"
            }
            steps {
                dir('Kubernetes-Manifests-file/Frontend') {
                    withCredentials([string(credentialsId: 'github', variable: 'GITHUB_TOKEN')]) {
                        sh '''
                            git config user.email "aman07pathak@gmail.com"
                            git config user.name "AmanPathak-DevOps"
                            BUILD_NUMBER=${BUILD_NUMBER}
                            echo $BUILD_NUMBER
                            imageTag=$(grep -oP '(?<=frontend:)[^ ]+' deployment.yaml)
                            echo $imageTag
                            sed -i "s/${AWS_ECR_REPO_NAME}:${imageTag}/${AWS_ECR_REPO_NAME}:${BUILD_NUMBER}/" deployment.yaml
                            git add deployment.yaml
                            git commit -m "Update deployment Image to version \${BUILD_NUMBER}"
                            git push https://${GITHUB_TOKEN}@github.com/${GIT_USER_NAME}/${GIT_REPO_NAME} HEAD:master
                        '''
                    }
                }
            }
        }
    }
}
For Backend Jenkins pipeline:
pipeline {
    agent any
    tools {
        jdk 'jdk'
        nodejs 'nodejs'
    }
    environment  {
        SCANNER_HOME=tool 'sonar-scanner'
        AWS_ACCOUNT_ID = credentials('ACCOUNT_ID')
        AWS_ECR_REPO_NAME = credentials('ECR_REPO2')
        AWS_DEFAULT_REGION = 'us-east-1'
        REPOSITORY_URI = "${AWS_ACCOUNT_ID}.dkr.ecr.${AWS_DEFAULT_REGION}.amazonaws.com/"
    }
    stages {
        stage('Cleaning Workspace') {
            steps {
                cleanWs()
            }
        }
        stage('Checkout from Git') {
            steps {
                git credentialsId: 'GITHUB', url: 'https://github.com/AmanPathak-DevOps/End-to-End-Kubernetes-Three-Tier-DevSecOps-Project.git'
            }
        }
        stage('Sonarqube Analysis') {
            steps {
                dir('Application-Code/backend') {
                    withSonarQubeEnv('sonar-server') {
                        sh ''' $SCANNER_HOME/bin/sonar-scanner \
                        -Dsonar.projectName=three-tier-backend \
                        -Dsonar.projectKey=three-tier-backend '''
                    }
                }
            }
        }
        stage('Quality Check') {
            steps {
                script {
                    waitForQualityGate abortPipeline: false, credentialsId: 'sonar-token'
                }
            }
        }
        stage('OWASP Dependency-Check Scan') {
            steps {
                dir('Application-Code/backend') {
                    dependencyCheck additionalArguments: '--scan ./ --disableYarnAudit --disableNodeAudit', odcInstallation: 'DP-Check'
                    dependencyCheckPublisher pattern: '**/dependency-check-report.xml'
                }
            }
        }
        stage('Trivy File Scan') {
            steps {
                dir('Application-Code/backend') {
                    sh 'trivy fs . > trivyfs.txt'
                }
            }
        }
        stage("Docker Image Build") {
            steps {
                script {
                    dir('Application-Code/backend') {
                            sh 'docker system prune -f'
                            sh 'docker container prune -f'
                            sh 'docker build -t ${AWS_ECR_REPO_NAME} .'
                    }
                }
            }
        }
        stage("ECR Image Pushing") {
            steps {
                script {
                        sh 'aws ecr get-login-password --region ${AWS_DEFAULT_REGION} | docker login --username AWS --password-stdin ${REPOSITORY_URI}'
                        sh 'docker tag ${AWS_ECR_REPO_NAME} ${REPOSITORY_URI}${AWS_ECR_REPO_NAME}:${BUILD_NUMBER}'
                        sh 'docker push ${REPOSITORY_URI}${AWS_ECR_REPO_NAME}:${BUILD_NUMBER}'
                }
            }
        }
        stage("TRIVY Image Scan") {
            steps {
                sh 'trivy image ${REPOSITORY_URI}${AWS_ECR_REPO_NAME}:${BUILD_NUMBER} > trivyimage.txt'
            }
        }
        stage('Checkout Code') {
            steps {
                git credentialsId: 'GITHUB', url: 'https://github.com/AmanPathak-DevOps/End-to-End-Kubernetes-Three-Tier-DevSecOps-Project.git'
            }
        }
        stage('Update Deployment file') {
            environment {
                GIT_REPO_NAME = "End-to-End-Kubernetes-Three-Tier-DevSecOps-Project"
                GIT_USER_NAME = "AmanPathak-DevOps"
            }
            steps {
                dir('Kubernetes-Manifests-file/Backend') {
                    withCredentials([string(credentialsId: 'github', variable: 'GITHUB_TOKEN')]) {
                        sh '''
                            git config user.email "aman07pathak@gmail.com"
                            git config user.name "AmanPathak-DevOps"
                            BUILD_NUMBER=${BUILD_NUMBER}
                            echo $BUILD_NUMBER
                            imageTag=$(grep -oP '(?<=backend:)[^ ]+' deployment.yaml)
                            echo $imageTag
                            sed -i "s/${AWS_ECR_REPO_NAME}:${imageTag}/${AWS_ECR_REPO_NAME}:${BUILD_NUMBER}/" deployment.yaml
                            git add deployment.yaml
                            git commit -m "Update deployment Image to version \${BUILD_NUMBER}"
                            git push https://${GITHUB_TOKEN}@github.com/${GIT_USER_NAME}/${GIT_REPO_NAME} HEAD:master
                        '''
                    }
                }
            }
        }
    }
}